
For the first time in many months, I had the opportunity to attend an in-person, rather than Tabletop Simulator, tournament last weekend. This was the latest iteration of the St Albans Smackdown, a very well run event held in the town of St Albans (for non-UK readers, this is just north of London) which is within 2 hours of where I live – I know it well from when I used to live just round the corner. The TO is on the ball, the venue is fairly convenient, there’s a fairly high standard of tables brought along by the participants, and the overall atmosphere is one of good sportsmanship and bonhomie. Probably my favourite regular Infinity event.
Table of Contents
The Missions
The Missions for this iteration would be Power Pack, Quadrant Control and Firefight. Power Pack is a really weird one with split deployment zones in the corners of the table. Its Objectives favour going second, it’s quite difficult to score highly on, but easy enough to make a few OP if you don’t get absolutely smashed. Quadrant Control, I don’t mind, but my criticism is that it normally heavily favours the second player – so much so that it’s almost impossible to score a full 10 OP, or even 9, if going first against a strong opponent. Firefight is an old standby and classic. Interestingly, the TO’s decision to make it the final mission is praiseworthy, because usually a simpler and more aggressive mission is easier when everyone is mentally exhausted at the end of the day. But on the other hand, this means it’s the mission played for the top table game(s). And in my opinion, with the current strong meta lists, the player going first has a strong advantage.
Those were my opening thoughts on the missions – it’s interesting in hindsight to see how my games worked out!
The Players
One thing I want to commend about the Smackdown is that we had a fine turnout of gifted players. ITS Rankings aren’t a rigid hierarchy in the relatively small pool of the UK Infinity scene, since they are based on a limited number of event results, but the current top UK player was in attendance, as were a few others in the top 10. More importantly, perhaps 6-7 of the other players there I know as being top rate, players who would absolutely be in competition for the top table. So although it was a small event on paper, with just 16 players, I was looking forward to challenging games. We also had a good mix of interesting factions, including vanilla and Sectorials. The event details including all final placements and game results (spoilers) can be seen here – the ITS website is actually really good at publicly recording events.
My lists
My initial mission analysis made me want to write one list for Power Pack/Quadrant Control, where I prefer going second and where Infiltration and other Forward Deployment is extremely beneficial, and one for Firefight, where I love going first, forward Specialists are a liability, and and 16” deployment zones give a relative boost to warbands and other non-infiltrating pieces. I have been doing my lists this way – decide on a mission split and pre-pick which list to use for every mission – for a long time. But recently I have heard some competing views which are quite compelling. It can be very useful to keep the option to pick a list for terrain or the opposing faction. So I also wanted to take two quite different lists, so that I could switch my mission-oriented original decision if I felt it necessary.
My only painted army is Nomads/Corregidor, so under those mission parameters, I decided to play vanilla Nomads. I was tempted by Corregidor’s access to McMurrough and warband Haris Fireteam options for Firefight, and by aggressive Fireteams for Quadrant Control, I ultimately thought my best option for going second and still holding far quadrants, or threatening the central line and enemy table half objectives in Power Pack, was massed infiltrating specialists and/or Camouflage. Corregidor can do this, but it’s more versatile and efficient with vanilla Nomads. I also had an alternative plan for Firefight with vanilla Nomads which I thought would be equally effective. Finally, I have recently put together some nice proxies (I don’t like the official sculpts) for Uberfallkommando and Puppetbots. I wanted to use them, both because I like my proxy models and because they’re excellent competitive units.
List 1
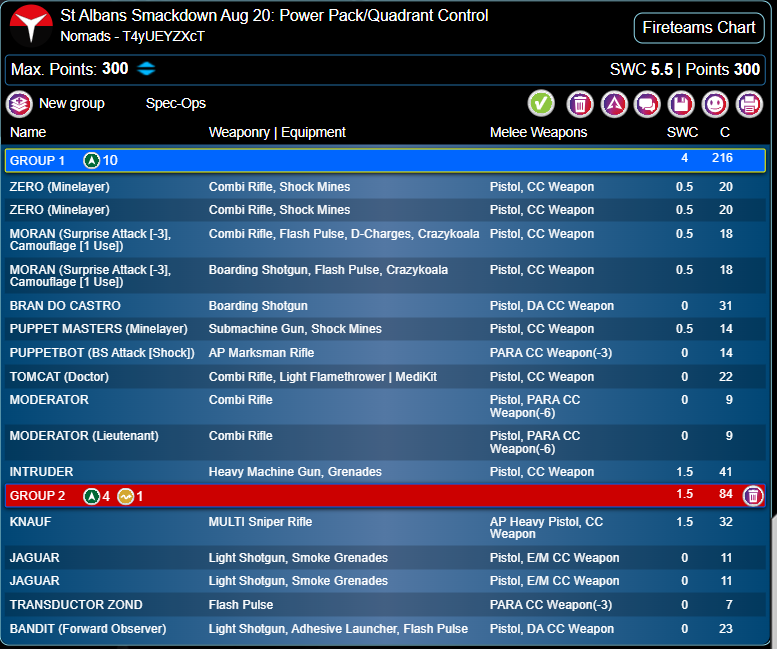
So this was my default list for Power Pack and Quadrant Control. I’ve read another tournament player refer to this sort of thing recently as ‘how Nomads used to be in N3’. Camo spam and delicate 1 Wound MSV gunfighters may not be in fashion for Nomads right now, but the faction still has those tools and I still like them! The idea here is that if I go second, as I would like to, I hide in my Camouflage and let my deployable weapons soak some Orders – everyone tucks their head down in the classic null deployment. The only real weakness is if the opponent has Sensor, or has some highly aggressive units to attack my deployment zone, like Impersonators or Bearpodes. If they have the nerve and the Order pool, a good opponent can blow through the camo field ignoring everything, and potentially kill both my possible Lts and the Puppetmaster, alongside some less important things.
I initially considered an Interventor Lt, but cutting down to 2 Moderators (probably the standard Lt choice for Nomads at the moment) let me squeeze in more camouflage. I also considered dropping the Tomcat Doctor for another unit starting on the gable (probably even more camouflage) but decided he was too big a potential rescuer of the many game-winning but fragile models the list already included, as well as being quite handy for both missions in himself. Finally, I pondered swapping Knauf for a Spektr sniper, to lean even harder into camouflage, or in this case, Hidden Deployment. Overall I was happy with those little tweaks on the day.
List 2
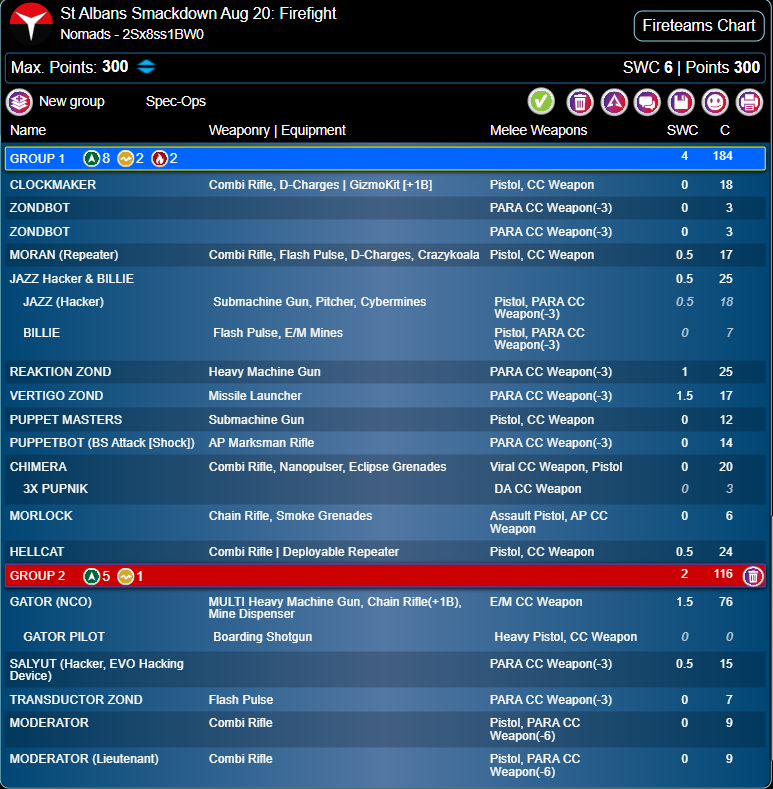
My other list was what I personally think of as the ‘current meta Nomads’. A TAG, an Uberfallkommando, a Puppetmaster, Jazz, Moran Masai, just a lot of the good stuff in vanilla Nomads, which fits together to make a list that has very good options to punish both AROs and null deployment; defensively it can also be very strong although it will punish your own deployment mistakes heavily. If the right enemy piece gets past a couple of repeaters and templates it can wreak absolute havoc, since the list has some delicate moving parts. I had a particularly galling lesson in this during a practice game – I thought I had a Hac Tao very well pinned down, out of its Marker state, between a repeater, a TR bot, a flash pulse etc . . . turns out that if the Hac Tao beats the TR bot, tanks Oblivion and the flash, and walks round a corner out of your hacking area and LoF, you don’t get another chance to stop it before it guts your vulnerable backline. But it has enough defensive and offensive ability that this kind of list is a staple I see in tournaments, for good reason.
So while like any list, it isn’t perfect, I know the underlying structure is sound. It’s not quite the classic build. I wanted to try the Gator over the Szalamandra, which is admittedly, if serving as pure long range firepower protected by the rest of the list, a better option. Then I wanted a Salyut to resupply the Gator’s mines, a cute trick which in fact I never used. Might as well make it an EVO Hacker to support the TR bot, which I am very fond of due to its efficiency and versatility as both an attacker (with Climbing Plus) and defender, and the Hellcat. Yes, I took a Hellcat over a more common option like the Heckler with Fast Panda. My rationale was that it’s Firefight, so why not take advantage of the mission’s boosts to Parachutist & Combat Jump. In retrospect, the first group doesn’t have that many Regular Orders on the table, so I’d certainly change that in other missions. My Gator/Salyut fixation also left me short of points for a second Moran Masai – heresy! I really should have included two, but I had an urge to go wild. I’m pretty sure it’s the first Nomads/Corregidor tournament I’ve attended in N4 that didn’t have 2 Morans in each list.
Tangent: My Table
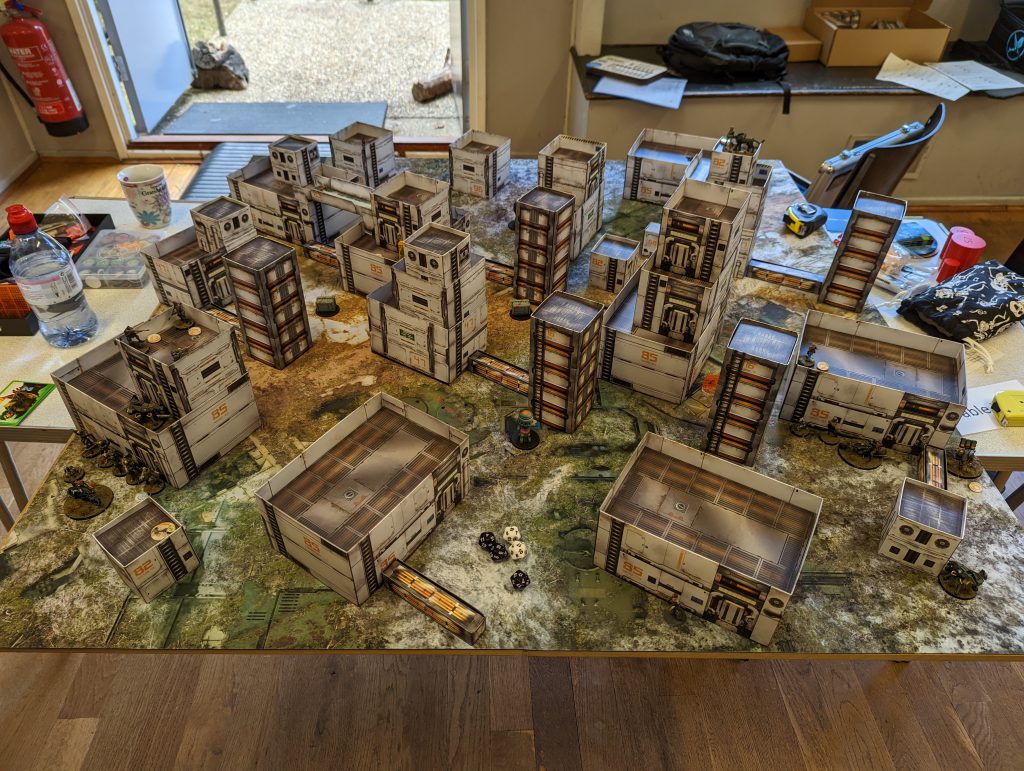
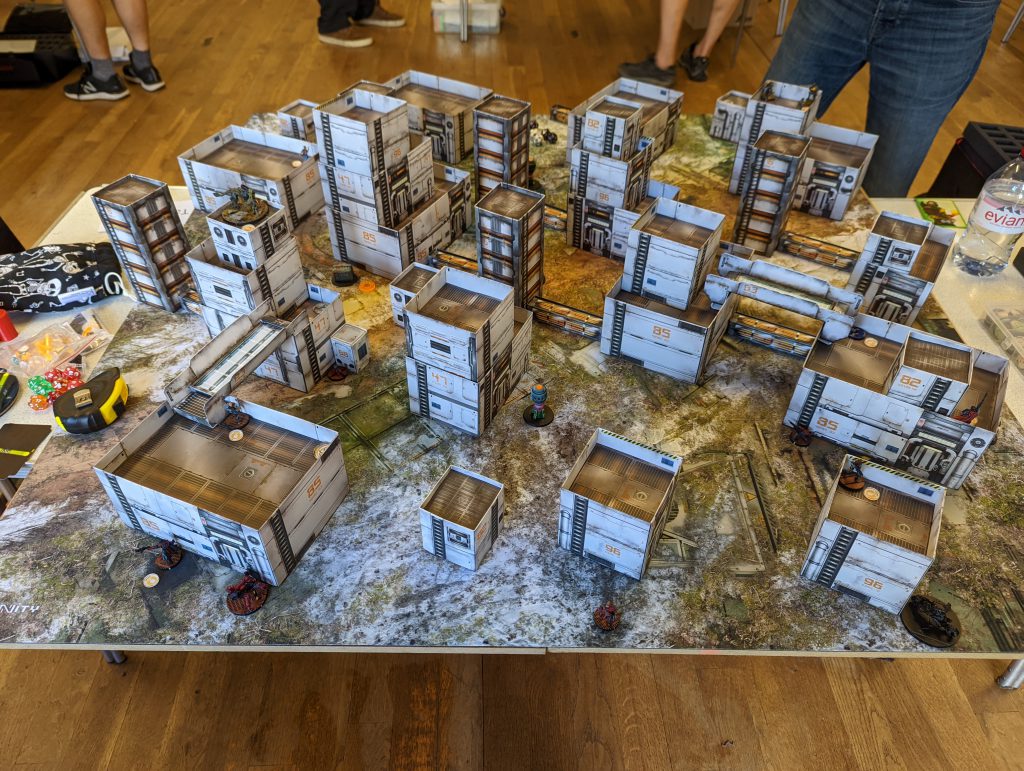
This isn’t strictly relevant to a tournament/battle report, but I wanted to share my work-in-progress Infinity table. The Smackdown venue does host a small gaming club, but it doesn’t have 8 tables’ worth of terrain, it mostly relies on attendees bringing sets along. For the first time I was in a position to do so and it really pleased me to see it in action.
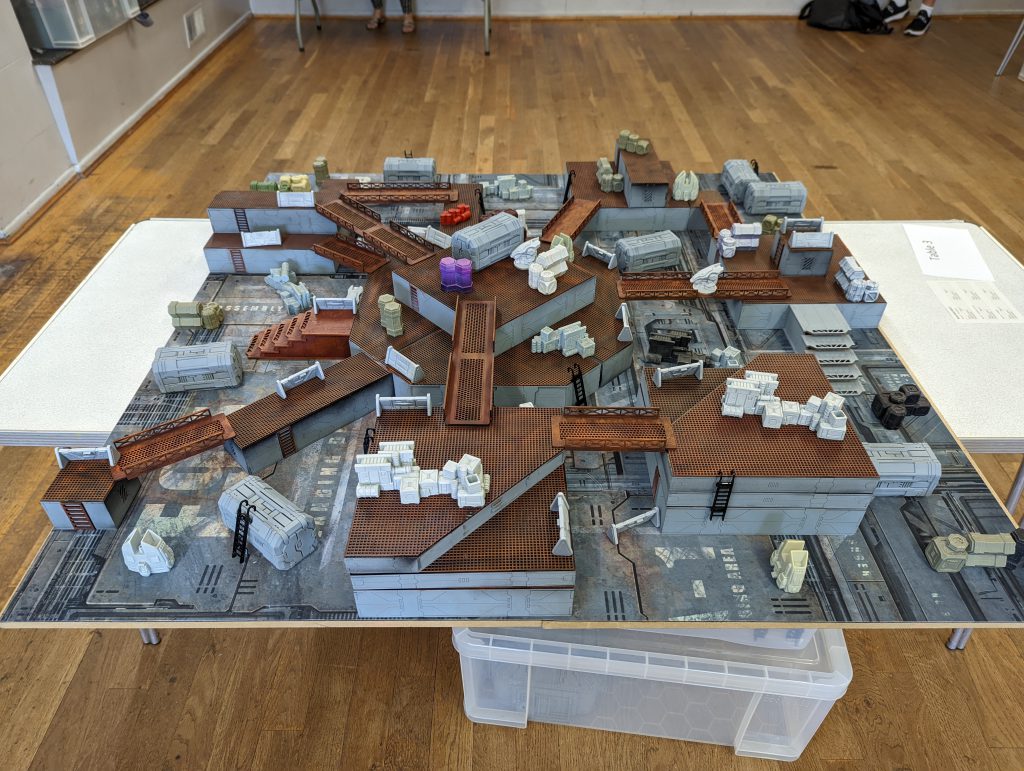
Basically this is simple block-shaped MDF terrain (Wildlands Terrain, a Ukrainian company that sells via a FaceBook store) with plastic canvas, aka ‘granny grating’ cut to size and glued on top to provide texture. I have some solid stairs from the same supplier, the bridges are MDF, from a UK company called Wargame Tournaments terrain. I have some hardfoam crates, and resin Objectives, from Micro Art Studio, and a heap of resin scatter terrain, also largely Micro Art Studio, but also Antenociti’s Workshop and Spartan Scenics (both sadly now defunct) that I picked up mostly secondhand over several years. I also have a Warsenal objective room (not pictured). It all fits into a big old 64L Really Useful box, with a smaller storage box for the scatter terrain. I lay this all out on a Deepcut Studios gaming mat which I find quite handy for Necromunda as well.
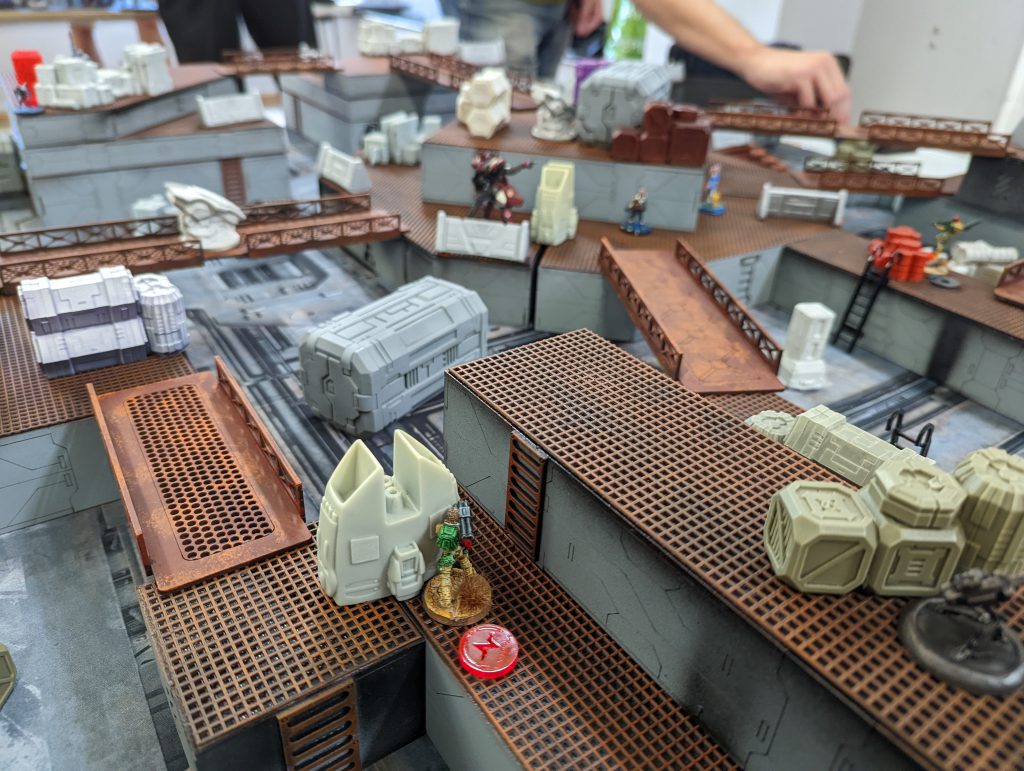
I was very excited to see the table in action. I asked those playing and the consensus (although they may have been being polite) was that it was fun to play on, which was my main goal. I wanted a table that was solid and simple, without any easy-to-miss AROs through windows, or indistinct edges or terrain rules. I also wanted it to be highly modular, and to avoid any ‘castles’, eg rooftops with parapets to hide Prone models all around. My philosophy is that while there should be plenty of terrain to hide from 1-3 sides behind, there should be almost no places where you are hidden (outside of very close range) from all 4 sides. I also wanted plenty of ladders and walkways to enable movement. Ideally, on the ‘upper level’ formed by the platforms, models should still have a lot of freedom to cross the table without spending movement going down, across and up again. Hopefully this creates an environment where models can play hide-and-seek in the canyons on the ground level and plateaus on the top.
![]()
![]()
The Games
Round 1 – Power Pack, against Operations Sub Section (OSS)
For the first round, I drew against an experienced, very capable player, who I have had many close games against over the years, and this would be no different. Winning the Initiative roll on a critical 14, he elected to go first. That suited me down to the ground as I have a preference for going second in Power Pack. His deployment involved a full Core Dakini Fireteam plus a spare, with Paramedics, an MSR and HMG, led by a Deva MSV2 Spitfire – by far the bulk of his combat power – and an array of support specialists like an Apsara and a Danavas hacker, Netrods, basically cheap stuff.
I was a bit nervous when, having deployed, he informed me that he was holding 2 models back without spending a Command Token. In retrospect I should have identified his Shukra Consultant as the obvious Strategos Lt, but I was in dread of a Marut, which with its MSV2 and ability to shrug most Normal ammunition Damage 13 shots, would have been an alpha strike nightmare for my list. I should have remembered that the Marut is WIP15, so couldn’t have been his Lt. In the event, I deployed quite cautiously, hiding up on roofs tucked behind parapets where possible, he set down Posthumans and Andromeda as his reserves, and not seeing any huge danger of getting rolled through completely, I deployed Knauf, my reserve, tucked away completely for later.
I am not a huge fan of box-building tables, where each separate building has a surrounding parapet that completely hides prone models from view, unless the Active player can stand on a higher rooftop very close. I think it makes it too easy to turtle up, both in Deployment and throughout the game. These table characteristics would have a real impact on this game, especially combined with the central Saturation Zone which has a further deadening effect on Active turn firepower.
Top of Round 1, I declined to strip any Orders from my opponent as I knew he had Counterintelligence. He struck down my flank with his Red Fury Motorised Bounty Hunter (the free mission bonus) and killed a Jaguar, but stalled trying to kill my Puppetmaster and Flash Pulse bot. He had to use his Posthuman Engineer’s servant bot and his SMG MBH (which was actually part of his list) to clear mines and crazy koalas – the servant tanked the hits, but fortunately for me his MBH died. He then spent the rest of his Orders getting his Dakini Core Fireteam clustered around a central tower, with their sniper left in his starting position in the table corner. This then allowed his MSV2 Spitfire to Discover-Shoot and send plunging fire into my combi rifle Moran Masai. I chose to not contest the ARO, but send out a koala covering his Fireteam. This forced him to break a Dakini from the team, setting off the koala and dying, and having to reform the Fireteam with a Command Token. I’m proud of my little resource-wasting decision there, but my opponent dealt with it in the best way possible, correctly identifying his Deva MSV2 Spitfire as a key piece and wanting to avoid risk on it. My opponent ended his turn with a 4-model Core team on top of and around a central building, quite exposed, but the Deva was prone in a literally unreachable position. It wouldn’t fire another shot all game, but it really shaped a lot of my decisions.
Bottom of Round 1, I had lost a Jaguar and a Moran Masai, as well as all my midfield deployables, but my opponent had lost a cheap model of his own and I could see he was exposed to counterattack, so I was quite cheerful about choices so far. I set about demolishing his Dakini with the Intruder HMG and Knauf, downing the Dakini sniper, HMG and 1 paramedic – but critically not actually killing any of them. His Red Fury MBH, which had ended in my Deployment Zone, was extremely irritating to remove. I pulled my Bandit back, away from the critical midfield objectives, to try it and despite good odds, failed (my opponent’s Booty roll of +2 ARM was exactly what was needed to save the model at one point) and ran out of Orders in Group 2. This was a blunder on my part. I ended up pulling a Zero Minelayer back in a similar way to kill the MBH. It was actually a slightly better odds FtF roll, and I wasn’t taking a specialist away from the mission critical area – I should have seen and executed this first. Finally, I sent Bran do Castro, who I had infiltrated normally at the halfway line, forward to try and get his Posthuman Engineer and Shukra Lt. Climbing Plus was very useful here. I made a mistake and missed that he had a long-range cross board ARO from a Flash Pulse bot, which led to me being discovered, which led in turn to being targetted. Nonetheless Bran do Castro reached his target, knocking out another Flash Pulse bot on the way . . . only for me to miss another ARO, his Posthuman Mimetism-6 sniper, who knocked Bran out. Sloppy play on my part, if I had checked before moving I could have had a good shot at his Lt and crucial Engineer with my boarding shotgun. The Intruder HMG avenged Bran by obliterating the Posthuman, and I passed the turn, hiding all my models away for fear of that Deva MSV2 Spitfire.
Top of Round 2, my opponent committed to simply undoing everything I’d achieved. Because I offered no AROs, his Engineer, ably assisted by a Servant bot, simply revived 4 models, and one of those models activated the central Objective. That completely stopped my momentum and the routes to victory started to close down. My opponent ended with several models standing offering AROs and one centrally deployed Dakini, critically, in Suppression. He did however try his revived Dakini sniper against Knauf (a bad idea – B1, thanks to the Saturation Zone, on 8s against my B1 on 13s) and got knocked out again.
Bottom of Round 2, several of my attempts to re-assert control of the board went wrong. A Zero tried to gun down a Dakini out of cover, and got knocked out in ARO. Knauf tried to neutralise a suppressing Dakini at >16”, my 2 dice on 10s vs his 2 dice on 2s, ate a crit and died. I tried to move a Bandit back toward the objective, and got knocked out by a Danavas hacker of all things. My one clever play was to bring on my Tomcat Doctor behind his Posthuman Engineer, kill it, and then go revive Bran do Castro. This was slightly Order intensive with one Cautious Move and one Move-Move Order, but again Climbing Plus was vital. I had to spend 2 Command Tokens to make the trauma surgery work, but I had just enough Orders left for Bran to trade with his Shukra Lt. In retrospect, this was a turn that basically brought the game further towards stalemate. I couldn’t sweep away his central AROs; tagging his Lt was a good play that prevented my opponent from getting any further grip on the Objectives himself, but it didn’t bring me any closer to them, and my Tomcat, by landing and going after Bran, lost his opportunity to go for the enemy HVT and secure his console Objective, which might have been more to the point.
Top of Round 3, in Loss of Lieutenant and with no Command Tokens left, my opponent simply stood everyone up to ARO. Andromeda, the Deva, everybody. He holds 1 central Objective, and neither of us are anywhere near the other’s console Objective or HVT, nor have we achieved any Classifieds.
Bottom of Round 3, after my mistakes and a bit of bad luck in the previous Round, I was missing some of the key tools and Orders that could have broken the deadlock. Here I think I could have played better. I couldn’t see a way to flip that central Objective, so had to sacrifice my remaining Moran Masai to secure one of my own. To be honest I was lucky to pass the WIP roll on my first (and it turned out only) chance, as he got killed by the Danavas hacker. I can’t be sure but I think there might have been a way if I’d thought more clearly. I am very clear on my other mistake – I spent 2 or 3 Orders on the Intruder trying to clear away Andromeda and the Apsara, both of which could stop my Tomcat from running to secure the opponent’s console. In retrospect, I’m not sure Andromeda could see the Tomcat’s route. I should have simply concentrated on the Apsara, and saving 1-2 Orders might have given the Tomcat a chance to reach it. As it was, we measured out the Orders I had remaining, and he simply wouldn’t have made the distance. That gave us a 4-4 Draw, for the same number of central Objectives, and keeping our consoles free from the enemy. Adding insult to injury, my opponent pointed out that if I was running the Tomcat into the open and falling short of the Objective, he had a final ARO – the Tomcat went down Unconscious, so I actually had fewer VP than my opponent (125 to 145).
Lessons Learned. I ignored a cardinal rule of trying to go second and snatch victory in these kind of missions – you have to be poised near them at the end of Turn 2. I was not mindful enough of controlling the area around the central Objectives. In fairness, I think I did some things right in my Turn 2 and was a bit unlucky. On the other hand, I failed to truly appreciate that securing the Console at the end of Round 3 wasn’t just a point, it would deprive my opponent of 3 points! Always read the mission carefully. So going for my opponent’s console with the Tomcat Dr (and I could have tried my HVT: Inoculation Classified Objective almost simultaneously) was probably a smarter move than reviving my Lt-assassination run. I am not sure, but if I’d had a Tomcat with a Zondcat Servant, an opportunity to do both might have shown itself.
Round 2: Quadrant Control, against Nomads
So a mirror match for Round 2! I am going to sound a bit arrogant here, but as we began the preamble and deployment of this match, I realised that my opponent, an absolutely lovely guy, was not an experienced competitive player. He won the Initiative roll, announcing an unusual-for-Nomads WIP14, and chose to go second. That is the right choice in Quadrant Control, and what I’d have done if I had won. However as he deployed, I was certain that neither his list or his positioning were defensive enough to withstand the onslaught of an opponent deploying second and going first. He scattered most of his pieces behind total cover, but a Mobile Brigada ML front and centre was only partially protected, a Brigada boarding shotgun near it was also standing up in partial cover, a camo marker I could plainly see was an Intruder started completely in the open in his DZ, and generally his vulnerable targets didn’t have any disposable warbands or deployable weapons covering them. He also had a single Securitate (WIP14) as his only possible Lt, despite fielding 3 Moderators (WIP13) in the same list. Now when facing a very competitive player, I can predict that certain best-in-faction pieces will show up. Conversely, when a player deploys a mix of slightly odd pieces without any of the archetypal faction favourites, I can infer that they aren’t super focussed on the competitive aspect.
Knowing I was going first and could be aggressive, I didn’t even reserve-deploy Bran do Castro, I just rolled for him (16s) and popped him down directly outside my opponent’s DZ in the centre. Then, admittedly riding my luck, I rolled to forward deploy my Bandit (10s) and did the same on my right flank. I then luckily rolled 8-4 Movement on that Bandit for maximum overrun potential.
Otherwise I simply deployed my Infiltrators and forward deployment into quadrants, with the Zero minelayers stopping his infiltrating Camo, which I knew from its Booty roll was a Bandit, from safely leaving its starting building. My DZ-bound models mostly deployed in positions where with a couple of Coordinated Orders they could start to contest the scoring Quadrants. My opponent’s reserve was Hidden Deployment, and mine was a conservative Knauf – I was so confident in the board position that I actually did deploy him standing up, well back on a tall building.

Top of Round 1, I immediately killed his Mobile Brigada ML with Bran’s boarding shotgun. As would set the pattern for the game, as well as having every advantage in the FtF roll, I also enjoyed good luck. I crit and hit, he failed all 3 ARM rolls (needing 12s as he was out of cover). I wounded his Brigada shotgun with my AP Marksman Puppetbot as I advanced both it and the Puppetmaster into scoring zones. Switching to the Bandit, I took out a Moderator, his Daktari, the Brigada shotgun and his Securitate Lt, sacrificing myself at that last hurdle. Finally, after coordinating movement forward into all 4 quadrants, at full stretch I got my Intruder HMG one Discover-Shoot at his Intruder in the open. Realising he would be Discovered on 14s, he made the supportable decision to shoot back, and very nearly won the FtF. However one hit went through and his Intruder went down. That could actually have exposed me to some danger had I lost the FtF, but with 4x16s against a 10, it was hardly over lucky.
Bottom of Round 1, my opponent has lost 6 models and is in Loss of Lieutenant. Rather demoralised, he pushed out a Crazy Koala with his Taskmaster and passed over the turn. Honestly, and no criticism intended, as he was an admirable sport about the whole thing, he could have at least tried to re-position his other remaining models, or place them on Suppressive Fire, to make things more difficult for me. He had no way to challenge an Intruder and Moran which were controlling one of his quadrants, so I did score the full 3 OP in Round 1, which is quite uncommon when going first in this mission.
Top of Round 2, I was actually rather worried about putting my opponent into retreat. I Intuititve Attacked his Bandit with a Zero Minelayer by trying to place a mine. He ARO’d with a mine of his own, which suited me down to the ground as it meant we were both effectively pinned in place, without either of us losing a model. I then brought on my Tomcat Dr, revived my Bandit, who then went down again trying to kill an ordinary Alguacil hacker. Clearly he was exhausted by his earlier efforts. The Bandit died to my own medikit before the Tomcat finished off the Alguacil hacker himself. I ensured I was scoring the HVT, re-camouflaged Bran and the Intruder in an enemy quadrant, and detonated my opponent’s Taskmaster’s koala with my Puppetbot (I failed to Dodge, but tanked the save).
Bottom of Round 3, my opponent laid another koala with his Taskmaster, and then moved to attack my Moran and Jaguar nearby it, not realising that Knauf was overwatching his position at very long range. I offered to let him take the Order back, but he elected to Dodge. Unluckily Knauf beat the roll and knocked him straight out. My opponent then brought on his Hellcat spitfire. It took his remaining couple of Orders to kill my Puppetbot, but did score him one of my near Quadrants (it’s 30 pts, the Moran and Jaguar I had there were 28). Fortunately for me, the scoring in Quadrant Control isn’t entirely zero sum. I still scored 3 OP for the Round, it just meant he scored 1OP as well.
Top of Round 3, I immediately knocked out his Hellcat, which was exposed in its forward position. A Moderator simply stood up from its rear-corner cowering hole and blasted it out of cover, where BS10 wasn’t an insurmountable handicap. At this point, with my opponent in Retreat, we agreed to call the game – he had no chance of scoring more Quadrants than me or of stopping me scoring one of his Quadrants. Similarly to Round 1, I think that a technically-minded competitive player could have stretched their resources a bit further here. Potentially he could have used that Hidden Deployment model (he never did reveal it) and at least taken 1 more OP for scoring one of my zones; he could even have robbed me of 1 OP by scoring 2 zone in total, possibly, if it all went right, and/or, if his Hidden Deployment was in the right place, denied me from Secure the HVT.
The game concluded in a 10-1 victory for me, with 267VP to his 67. (Officially – I think that he forgot to count his still-alive Bandit, which with that total would mean his HD model was a Prowler Spitfire. In fact he had 55 points left alive on the table, which doesn’t leave enough room for any HD, so I think he made a mistake and had perhaps 94VP left, which would have meant he wasn’t in Retreat)
Round 3: Firefight, against Haqqislam
Going into the final round, I realised I was not in contention to win the event, so there was no pressure, just time to unleash peak meta Nomad shenanigans in a classic aggressive mission. Once again, as luck would have it my opponent was not a widely experienced player. In this instance, I won the roll and chose to go first, as I always would for Firefight and I imagine most competitive players would. My opponent in turn picked what I would have said was the weaker deployment zone.
I also, as is traditional, forgot to take any pictures of the deployments in this final game.
I simply deployed most of my list in flexible positions, taking care to cover the DZ against Impersonators and the edges against Parachutists. I spent a command token to hold back both the Gator and the Uberfallkommando. My opponent deployed what I could see was not a very tuned-up or meta-conscious Haqqislam force. His powerful pieces were an Azra’il HMG, a Muyib HRL, a Djanbazan HMG and sniper (this last turned out to be his Hafza Lt). No Daylami, Kum bikers or Ghazis. Two hackers and two Drs, which is understandable in general but can be a liability in Firefight, where killing specialists is an Objective. One innovation was the presence of 3 Ghulam with Deployable Repeaters and E/M Mines. These have some fun utility as ARO pieces, but I’m not sure they’re as good for protection as cheap Irregular chain rifles, and more importantly, my opponent did not deploy them effectively covering his more valuable pieces.
Top of Round 1, I again got good value from Counterintelligence as my opponent declined to reduce my Order pool. So I simply blitzed with my Uberfallkommando on one flank and the Morlock on the other. Both got good use from their Impetuous Orders, scooting forward and with a Pupnik easily evading a HD Touareg Minelayer’s mine. The Uberfallkommando accounted for a Djanbazan HMG, Govad Hacker & Ghulam Dr, sacrificing all 3 Pupniks to do so. As they passed a Panoply they secured 2 items from it, which would practically guarantee me 1OP. Having a 4-model Synchronised unit is amazing value in so many ways. Across the board, the Morlock killed a Sekban Dr and ended up pinning down a Barid Hacker. I was light on things to do with my other Combat Group, so the Gator went forward, fired out some mines, killed 2 DepRep+E/M Mine Ghulams, and retreated again. In the process, I tried to shrug a light shotgun template, needing 6+ on my ARM roll, and failed. D’oh! However this inspired my opponent, in the next Order, to reveal Al Djabel, even though it meant him dying to a Gator-dispensed mine.
Bottom of Round 2, my opponent was very much on the back foot with 6 models down. He had no immediate option to deal with my Gator or Chimera, so focussed on triaging the Morlock. Unfortunately his Azra’il tried with a heavy pistol (2 dice on 16s vs my 1 smoke-dodge on 16) and I crit the smoke, so that he could not come out and see my Morlock again, without moving out of cover and encountering my TR bot. We discussed the position and I gave some advice on how he could get my Morlock outside of chain rifle range with his Muyib HRL. The Muyib came forward, burning down my Puppetbot en route, and dispatched the Morlock handily. Finally my opponent charged out of cover, guns blazing, with the Azrai’l. He lost the shootout to my TR bot but only failed 1 ARM roll and Guts Rolled into total cover.
Top of Round 2, I swept round the back of his DZ with the Chimera, killing his Hafza Lt with a Nanopulser before shooting the Muyib in the back. I then focussed on securing Classified Objectives to ensure a maximum score. I had Test Run (repair a STR unit), HVT Designation (Spotlight/Forward Observe the HVT twice) and Follow Up (HI or MI to WIP roll the HVT). I knew I could bank on Securing the HVT for one. I gambled a bit, and since I could try to achieve Test Run in one Order, my Gator having pulled back next to one of my Clockmaker engineer’s Servant bots, I did what I would advise no one to ever do, and tried to repair my non-Remote Presence TAG despite it not being Unconscious. I needed a 15, so as you might have guessed, I failed the roll and knocked the Gator down to 1STR remaining. Not risking that again, I dropped my Hellcat within ZoC of his HVT. My opponent bravely Dodged his remaining Ghulam, who was nearby but couldn’t see, into LoF of the Hellcat to contest me . . . but this put him where my Gator could sidestep and see him, and he was obliterated. On my advice my opponent, rather than Dodging against 4 dice on 17s, laid an E/M mine to pin my Hellcat, so it cost me an Order to trigger that with a Zondbot. Now my Hellcat spent the bulk of my Orders passing the WIP test for Follow-Up (on 16), dropping a Deployable Repeater, and allowing Jazz to pass 2 consecutive Spotlight attempts to score HVT Designation. 4 Orders well spent, and I’m lucky it wasn’t more! Shows you how Order-intensive these Classified-heavy missions can be. I now made a foolish error – he only really had his Barid Hacker, Azrai’l and Muyib left, all in his left quarter of the table, and he would be in Loss of Lieutenant next turn, so I cockily moved the Gator forward and set it in Suppressive Fire. Pride goeth before destruction . . .
Bottom of Round 2, my opponent struck back. His Azra’il met my TR bot head-on, 3 dice on 13s vs my 3 dice on 14s (I had Supportware Marksmanship and it was through a Blizzard Saturation Zone) and burned it to death in one Order. Then his Touareg minelayer, about whom I’d completely forgotten, appeared from thin air to shoot the Gator in the back from outside of ZoC. He landed 3 hits. It’s a normal rifle, so I need 6+ to save. I promptly fail 2 of the ARM rolls and straight up die. Despite it being too late to really alter the outcome of the game, this was both a genuinely funny moment and such a good example of how you should never either give up looking for attack angles, or grow overconfident in victory, in Infinity. The game can spin round as quick as that. My opponent handily scored a Classified Objective of his own, Net-Undermine, with his Azra’il.
Top of Round 3, although I was now bereft of any firepower, I still had the good old guided missiles. Jazz move-moved once, shot a Pitcher successfully (on 14), Spotlit the Azrai’l (a 14 vs his 14 to Reset) and then the Vertigo Zond dropped him instantly. I had a few spare Orders, but this is really as smooth as it can get, I was lucky. My Chimera, the absolute MVP of the game, then rushed in on his Barid Hacker and cut him down in close combat. My opponent’s last model was his Touareg minelayer. I tried shooting him with my Hellcat (3 dice on 9s to his 1 dice on 11) but lost the FtF and went down. Looking at the table, I simply moved another unit to secure his HVT behind Total Cover and called it there.
Bottom of Round 3, with one model, and no ability to draw LoF to any enemies with his single Order (I believe he was also technically in Loss of Lieutenant again) my opponent couldn’t achieve anything. The game therefore ended in a 10-1 victory for me, with a surprisingly low 149 VP to my opponent’s 30.
Lesson learned here, don’t risk your TAG in such a cavalier way! I was quite unlucky – the Gator took 5 ARM rolls throughout the game, all of 6+, and failed 3 of them, in addition to the Clockmaker failing its Engineer roll on 15. But even so, I shouldn’t have put it in such an exposed position. I think I also completely forgot about my Moran Masai, not just to use him, but also I think his Repeater and Crazy Koala should also have triggered against the enemy Muyib. What I was delighted with was the Uberfallkommando. It’s only my second time using them in a game (first outside of Tabletop Simulator) and they are a blast. If anything it inspires me to use more Puppetbots as well – I keep ending up with only 1 Puppetbot in my lists, and 2 is probably a sweet spot.
Conclusion
Well, a draw and 2 decisive wins were enough to net me 3rd place and a nice store credit voucher as a prize (I bought the Military Orders HVT / Curator / Hawkins pack). Once again the St Albans Smackdown has been a pleasure to attend as a tournament and a social experience. The next iteration will be in December 2022 – I will be there, family commitments allowing, and can’t advertise it enough.
I have usually played Corregidor more than Nomads; I still enjoy both, but will definitely try to explore the variety and unexpected tricks that the vanilla Faction can pull off. While lists are extremely important to success, as ever, the day’s games reminded me how important it is to keep the Objectives uppermost in your mind and to carefully measure every precious Order on a metric of ‘will this get me closer to that Objective. Thanks to all my opponents, and for the patience of all reading this, and I hope to be writing some more such battle reports soon.
Have any questions or feedback? Drop us a note in the comments below or email us at contact@goonhammer.com.
